Here is the Dive Gear Express recommended procedure to assemble and adjust our DGX Gears Harness with crotch strap (also called the DIR harness) on to a backplate. These instructions assume you are assembling our DGX Gears Harness, with Crotch Strap kit with all the accessories, but works equally well for any continuous webbing hogarthian harness without the ultimate accessories. The process should take about 60 minutes if this the first time you have assembled a harness. Tools that will make assembly easier are a measuring tape and a pair of needle nose pliers. All mention of left, right, front, and rear are interpreted from the perspective of the diver when wearing the harness.
Assembling a Hogarthian Harness
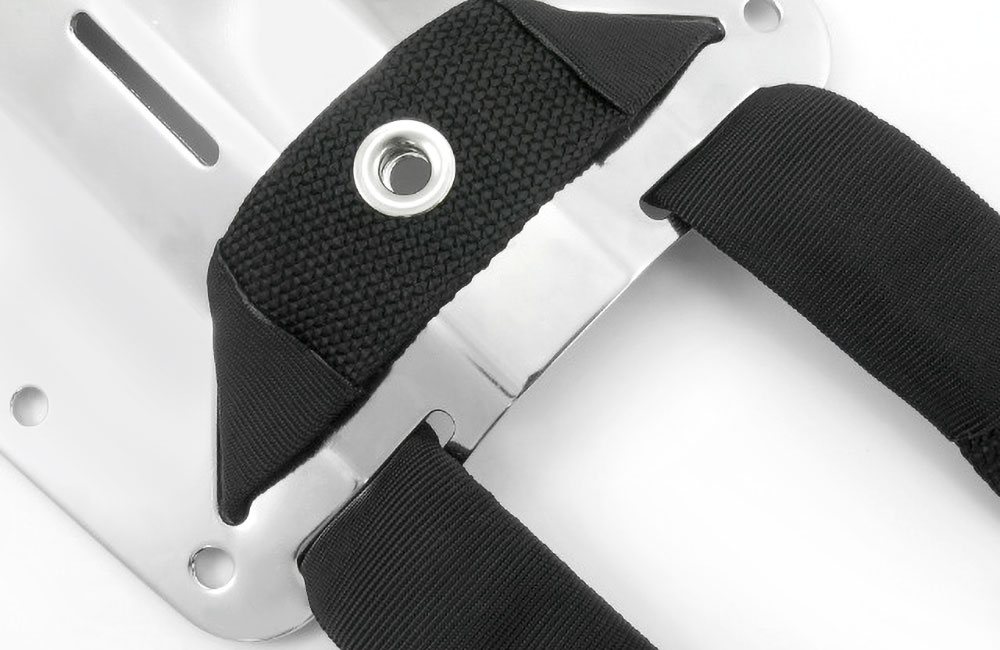
| Weave Shoulder Straps:Thread two tubular webbing sleeves on to the long webbing, one on each side of the grommet. Check the position of the webbing sleeves to verify the ends are centered approximately one inch on each side of the grommet. Position the grommet of the webbing over the upper bolt hole on the tank side of the plate. Thread the webbing through the angled slots to the diver's side of the plate, and back through the upper slots. With the grommet aligned over the bolt hole, only the webbing sleeves should be in contact with the plate slots.
The four included webbing sleeves are optional and may be omitted because the slots of most modern backplates (including DGX Gears plates) are polished to remove rough or sharp edges that could potentially damage harness webbing. |
 |
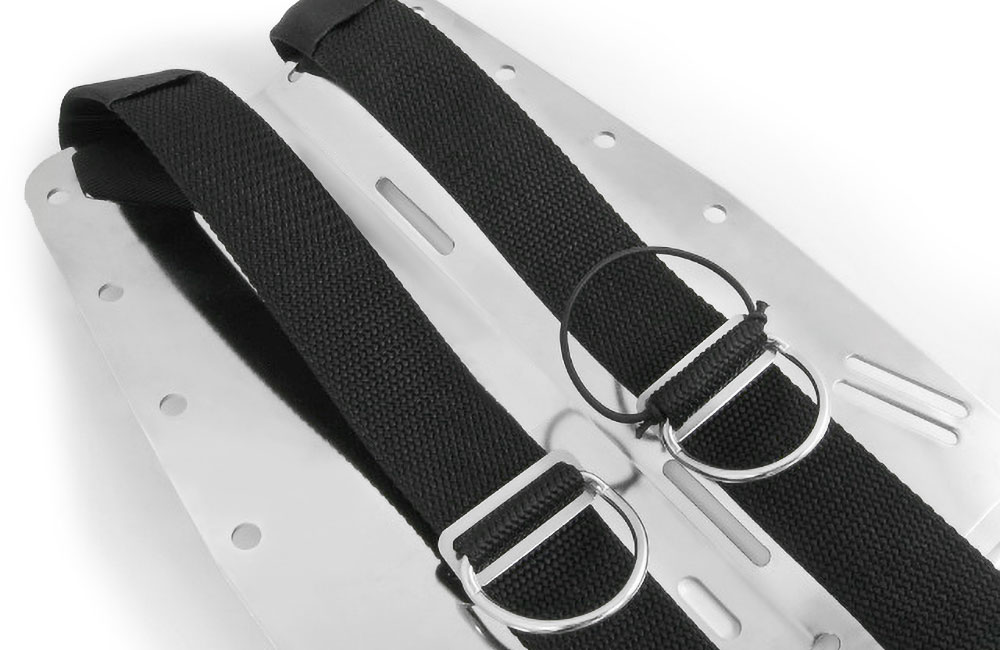
| Add Shoulder D-Rings: Install one bent D-ring and slide on the divers right shoulder strap, positioned approximately 12-inches of webbing length from the top of the plate. The bent D-ring is turned up to extend slightly from the strap. Thread the webbing up through one side of the slide, over the base of the D-ring and back down through the slide. Weave the left shoulder D-ring in a similar manner to the right. Along with the D-ring also include the bungee loop, so that both the D-ring and bungee loop are captured and held together in place by the webbing. |
|
| Add Elastic Bands and Webbing Sleeves: Thread one or two of the elastic bands onto each shoulder strap. Then thread a short webbing sleeve onto each shoulder strap. Position the sleeve so that the center of the sleeve is approximately 18-inches from the base of the shoulder D-rings. | 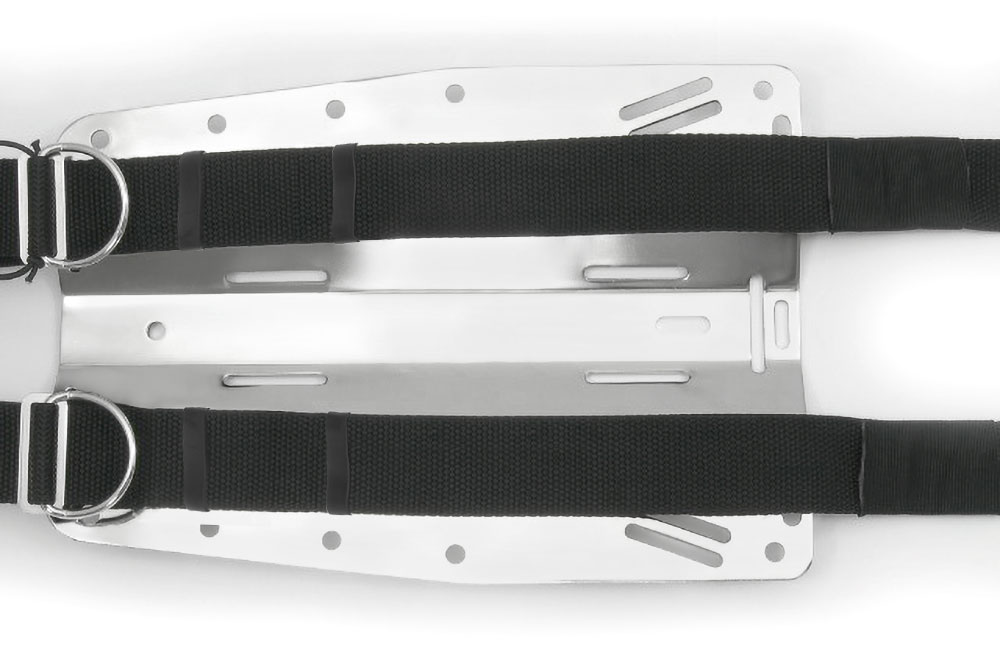 |
| Weave Waist Straps: Thread the webbing through the inside slots at the bottom of the plate, then through the slots closest to the edges of the plate to form the waist straps. Each of the webbing sleeves should be centered between the slots and only the sleeves should be in contact with the plate. The outside edges of the webbing should be at the top of the inner slots so that the outer faces of the shoulder straps become the inner faces of the waist straps. Properly threaded, the shoulder straps should lay flat against your sides without twisting. The included Loop Adjustment Ring (LAR) is an assembly option that allows the left shoulder strap to be freely adjustable, making your harness much easier to doff and don. Installing the LAR is simple: instead of weaving the left side of the harness waistband through the plate, insert the LAR into the back of the diver's left waistband slot on the plate and then thread the webbing through the LAR omitting the webbing sleeve. |
 |
| Add Waist D-Ring: Install one straight D-ring and slide on the left waist strap, positioned approximately one hand width of webbing length from the plate. | 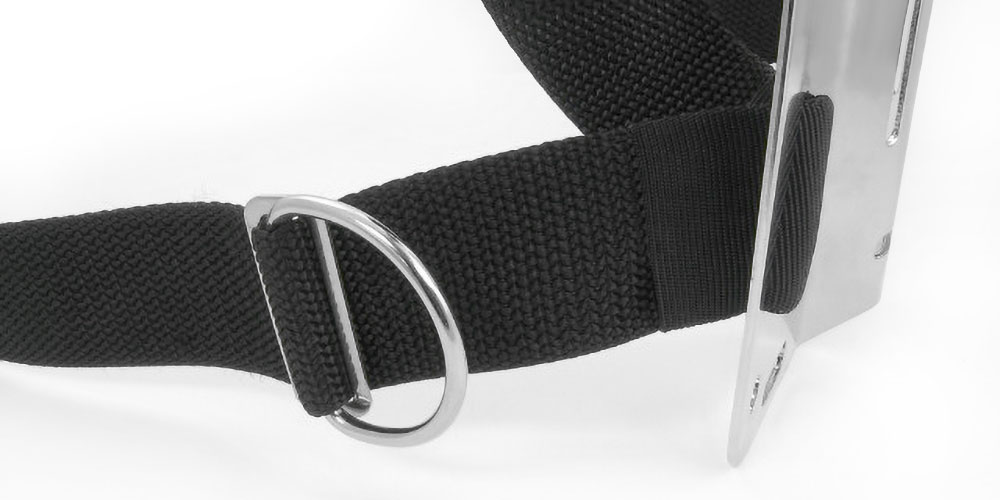 |
| Add Waist Strap Accessories: A loose black plastic buckle is provided for securing removable right side accessories, such as a light canister or pocket. For now, thread the right waist strap webbing through the plastic buckle gate and position the buckle close to the plate. Thread the strap through the end slot of the plastic buckle and close the tongue. Lace any non-removable left side accessories that will be permanently retained by the S/S buckle, such as a waist belt sheath for a line cutter, on to the left waist strap. | 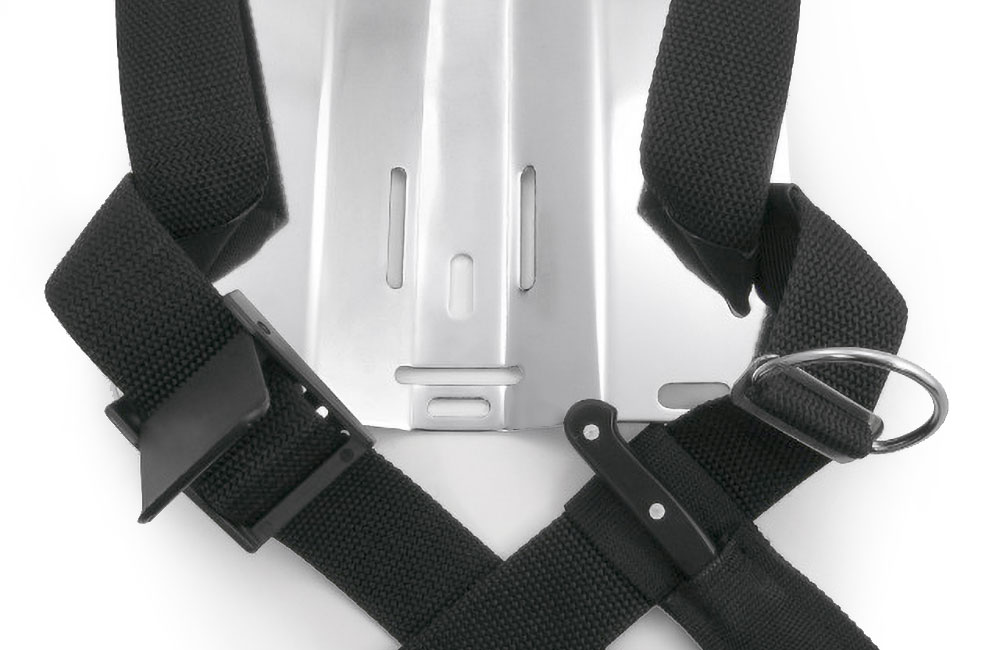 |
| Weave S/S Belt Buckle: Starting from the front of the metal buckle, thread the left waist strap through the larger end slot of the buckle. Position the buckle approximately 18-inches of webbing length from the plate left waist slot. Then thread the webbing from the back through the center slot and through the front of the inner most slot. Then thread the webbing through the back of the larger end slot so there are two thicknesses of webbing through one slot and pull the weave tight. The excess webbing will now be doubled back and lay flat along the inside of the left waist strap. | 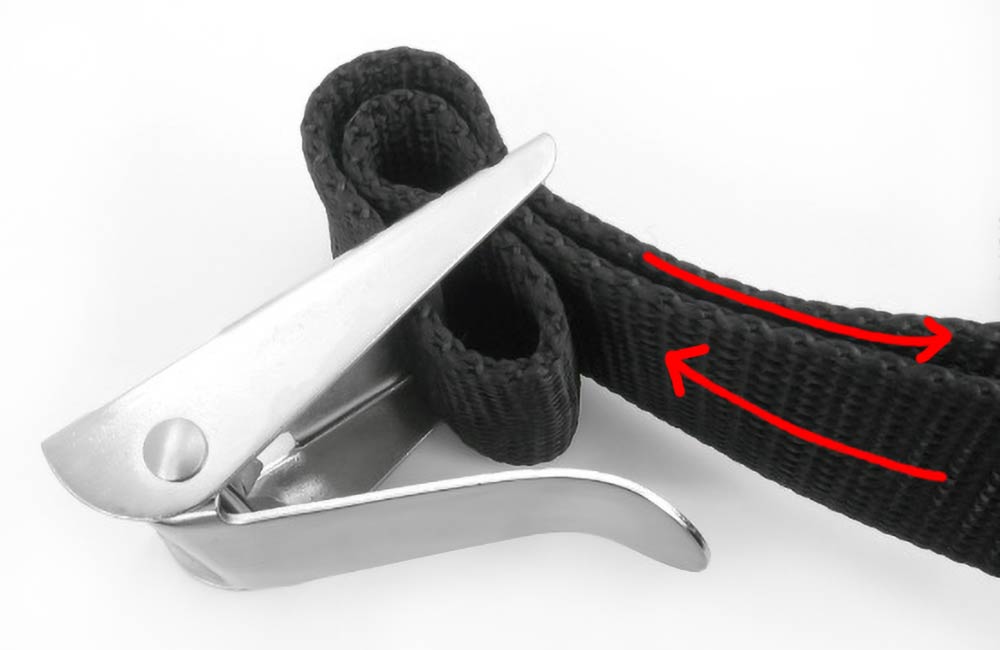 |
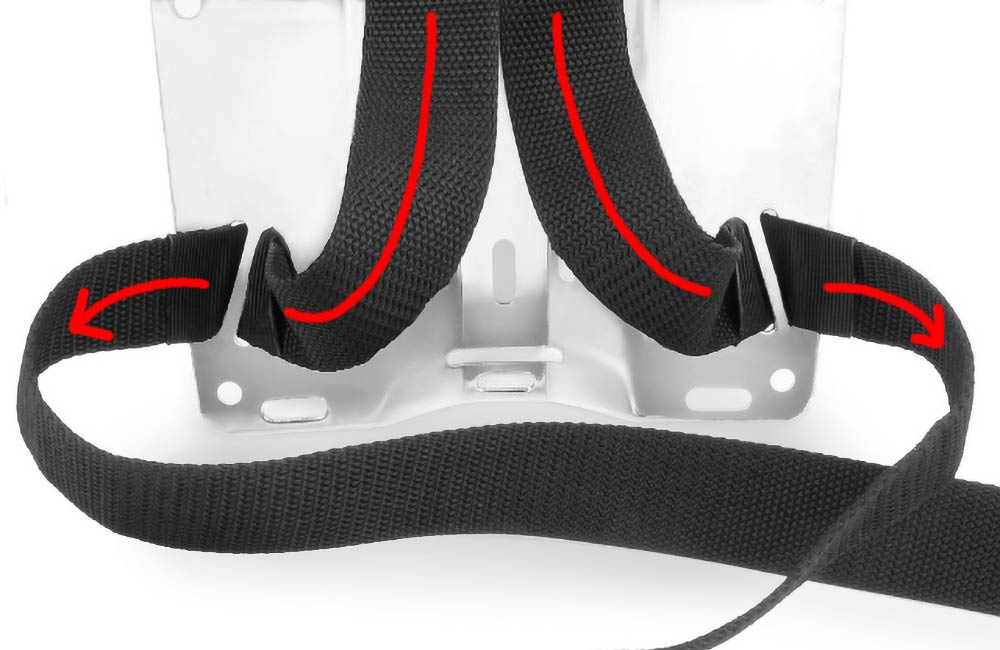
| Weave Crotch Strap: A bent D-ring with webbing slide, along with an abrasion sleeve, is shipped already laced onto the crotch strap, position the D-ring approximately 12-inches from the un-sewn end. With the bent D-ring pointing away from the diver, lace the tail of the crotch strap through the front of horizontal slot at the bottom of the plate and back through both slots of the webbing slide a second time, forming a loop about 4-inches in length. Pull the abrasion sleeve near the rear D-ring and tuck the excess of the tail end of the webbing into the sleeve. | 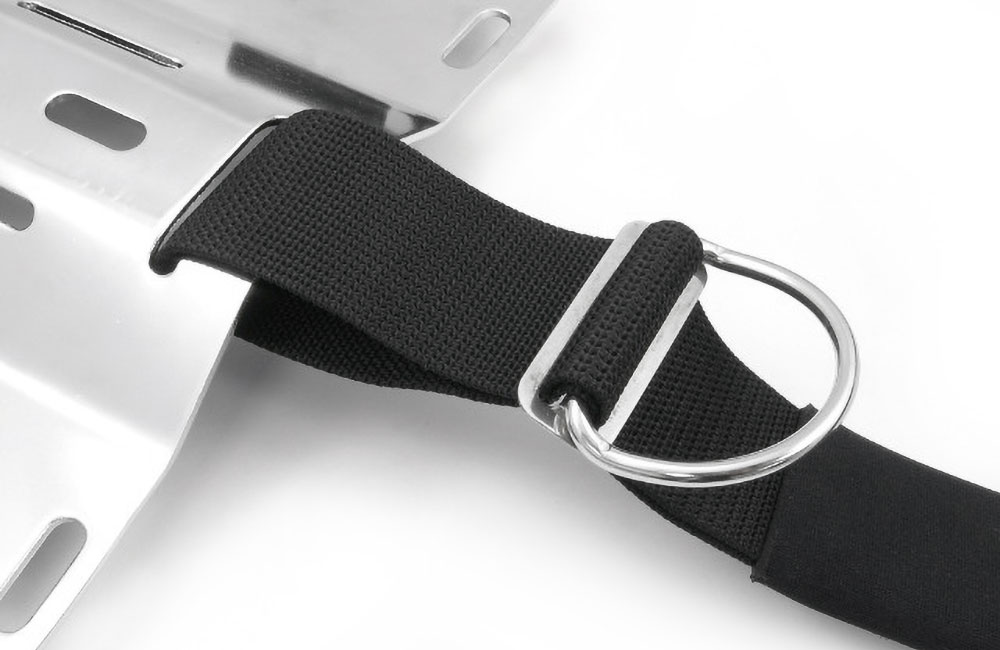 |
| Variations: The abrasion sleeve can be removed from the crotch strap. Particularly if scootering, the rear loop used to attach the crotch strap to the plate can be formed using a webbing slide separate from the one used to hold the rear D-ring. Use only two elastic straps on the harness and thread one on the inflator assembly near the elbow. Omit the bungee loop and thread one of the elastic straps on the left shoulder webbing above the D-ring for use in retaining the inflation hose assembly. Omit the plastic buckle and weave a long left waist strap so the metal buckle will reach far enough to the right to retain the canister. | |
Adjusting a Hogarthian Harness
| There are some initial dry adjustments of the harness that should be made to achieve a proper fit. Be patient; some adjustments may require partially disassembling and rethreading components of the harness. Avoid the temptation to trim any excess webbing from the straps until after final in-water adjustments are made and you are certain you are satisfied with the configuration. If the webbing is trimmed, seal the ends of the webbing with a flame or hot knife to prevent unraveling. | |
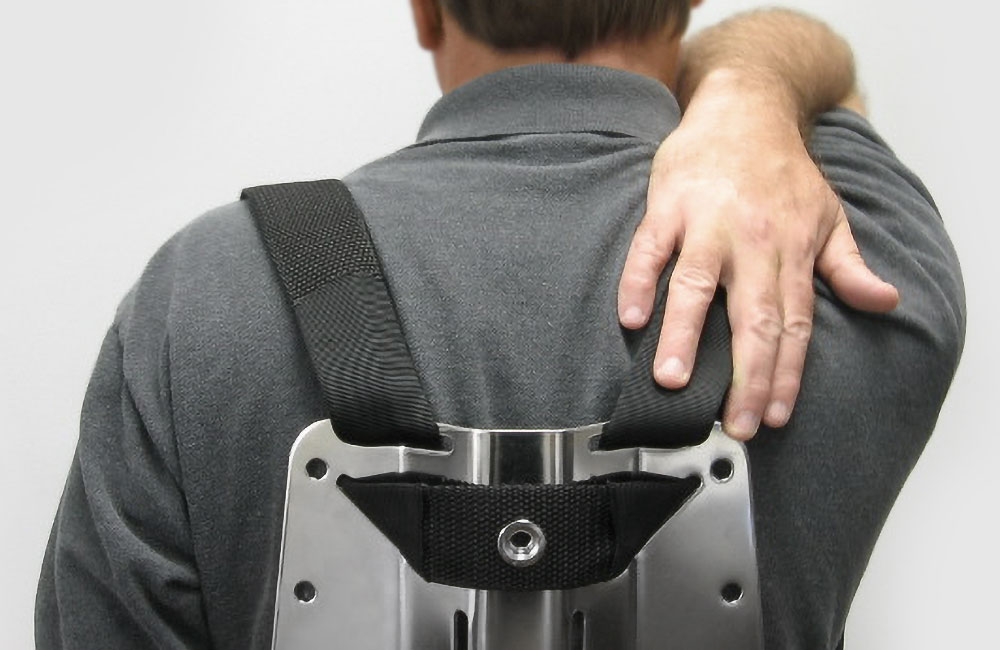
| • A common error is making the shoulder straps much too tight. Having the straps too tight will cause the plate to ride too high on your back and can also impede your respiration. Shoulder straps should be left loose enough that with your wrist resting on the top of your shoulder, you can reach down your back with your hand and touch the top of the plate. The top of the waist belt should fall at or slightly below your navel. |
 |
| • The shoulder straps should also be loose enough that you are able to easily slip your fist under the shoulder straps. Keep in mind that later you must be able to don your harness while wearing your exposure protection. The BC inflation hose assembly is threaded through, and retained by, the left shoulder bungee loop. | 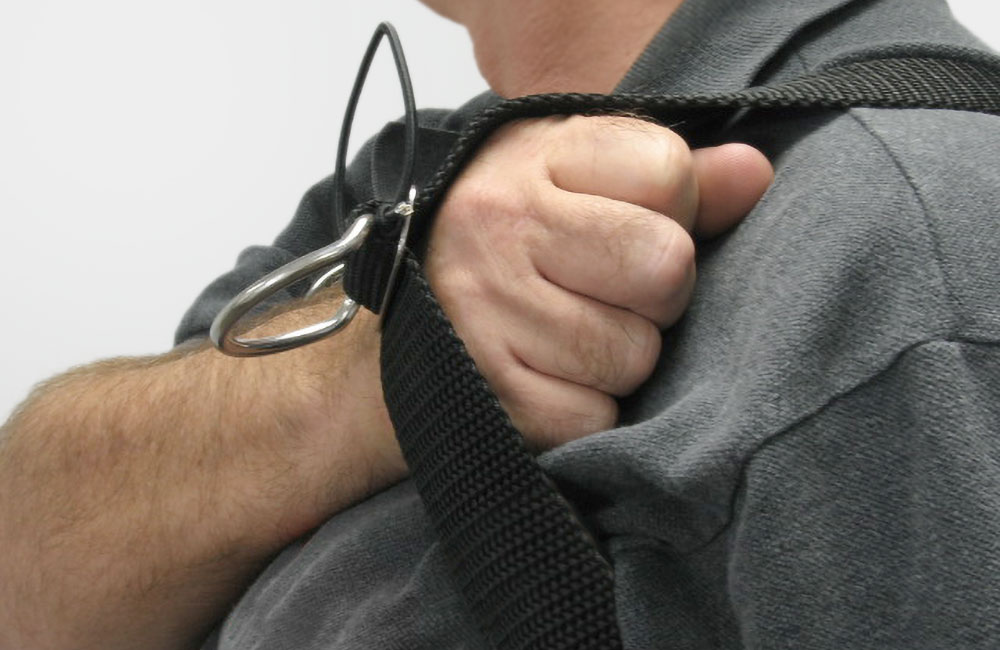 |
| • Adjust the position of the shoulder D-rings so they are facing out from your shoulder, a little above your arm pit at about your collar bone. Holding your arm straight out, make a fist like you are holding a clip. Close your eyes and bring your fist straight in to the harness shoulder strap, as if you were about to clip to the D-ring. Your fist should be touching the D-ring. | 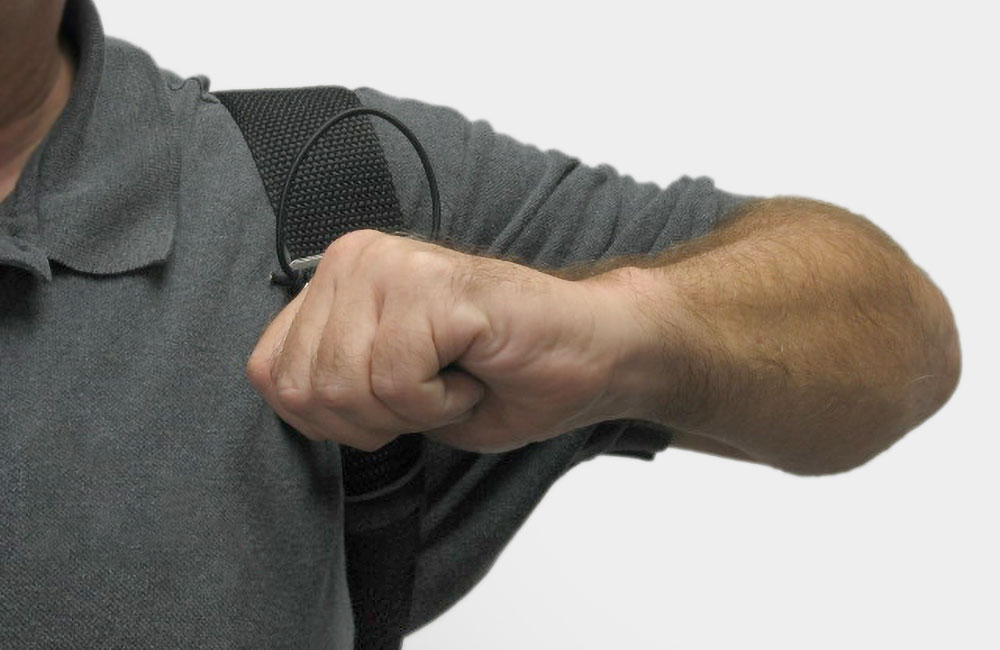 |
| • The waist D-ring is positioned along the mid-line of the diver's left side, about in line with where a tailored shirt side seam would lay. For most divers this will be about a hand width of webbing in front of the plate. | 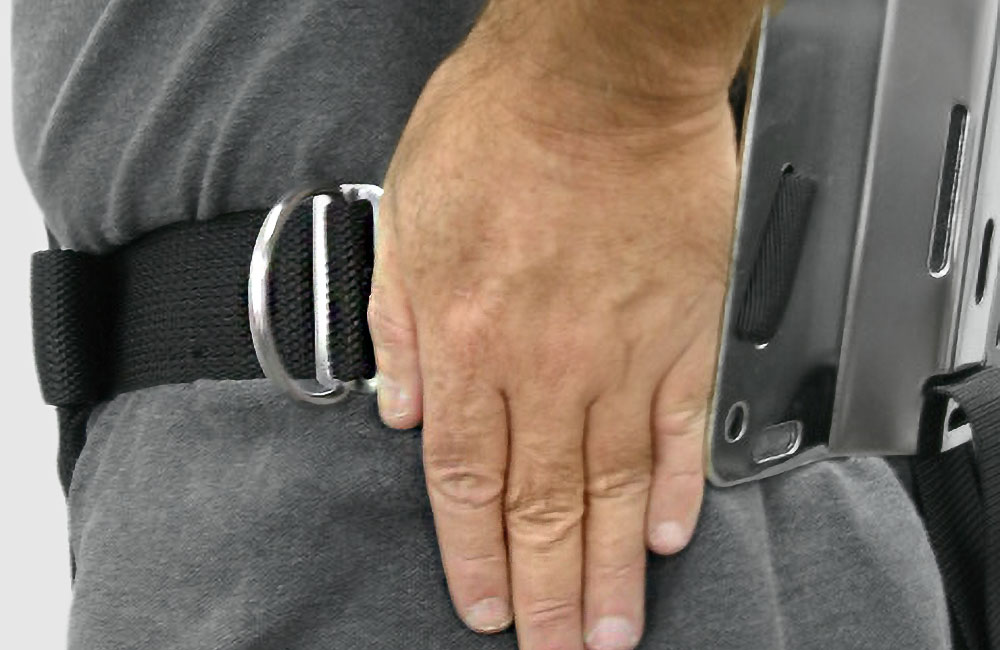 |
| • Adjust the position of the S/S buckle on the left waist strap so that the buckle is to the diver's right of center, allowing the crotch strap to be at the diver's center. If the right waist strap is excessively long, instead of trimming, you can weave it through the loop of waist belt sheath and even double back through the loops again if necessary. | 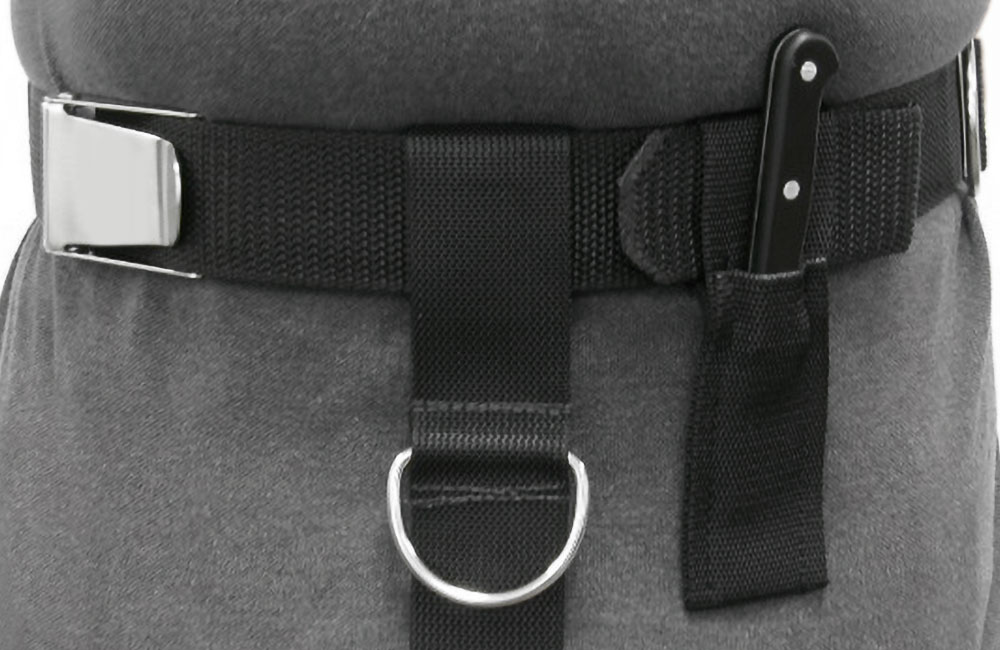 |
| • After adjusting the harness, adjust the length of the crotch strap to be snug. It should not be so tight as to pull the waist straps down. While adjusting the length of the strap, the rear D-ring should be positioned as high as possible where the D-ring can still be reached with your right hand and yet not be blocked by the cylinder(s). |  |
| • The primary light canister is pushed all the way back to the plate on the right waist belt and secured with the plastic buckle. If the light on/off switch is on the canister lid, some divers prefer to mount the light canister with the on/off switch pointed toward the divers feet in order to make the switch easier to reach. Using a separate plastic buckle to retain the canister instead of the metal buckle avoids scoring the canister, and allows harness doff and don without accessories sliding off the strap. The backup lights are clipped to the shoulder D-rings and secured with an elastic band. Even if not taking a canister light, you can also use the plastic buckle to secure a pocket. | 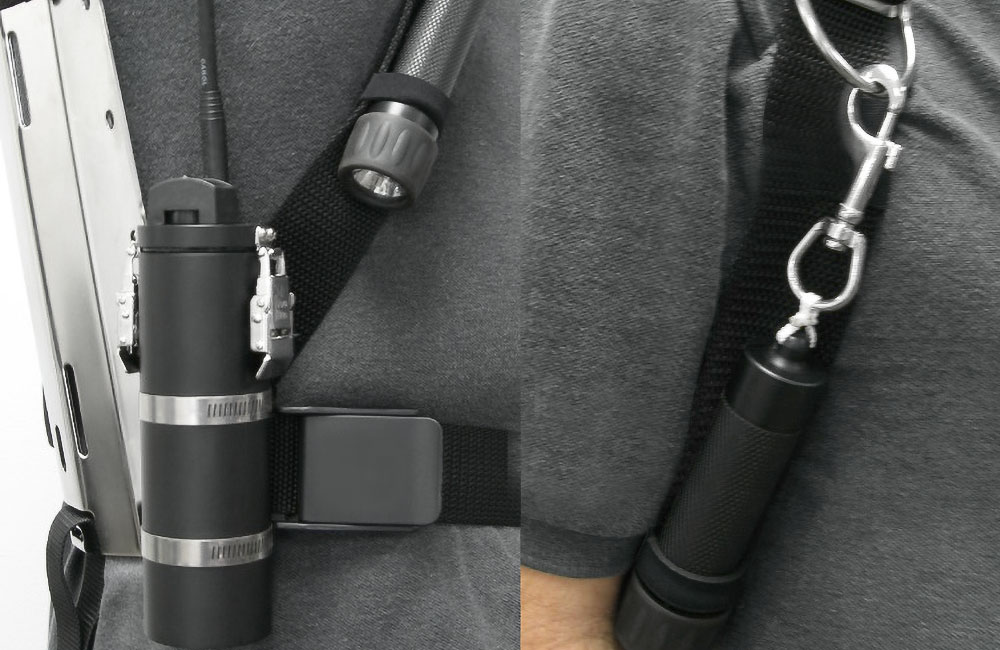 |
Once you are satisfied with initial dry adjustments, you are ready to make final minor adjustments. The most efficient and safest method is with assistance of your buddy or instructor in a swimming pool or other body of confined water. In shallow confined water you can work together and can make easy entry/exit to evaluate adjustments. While everything is soaking wet, repeatedly don and doff the harness with your entire diving configuration of cylinders, regulators, accessories and exposure suit. Tweak the length of the shoulder and waist straps along with the crotch strap until you can gear up easily and remove the harness quickly. Check the in-water trim. Many divers have said that when everything is correct, the configuration just 'feels right' and seems to automatically achieve proper trim. Next practice repeatedly clipping the SPG, primary regulator, stage/deco bottles, lights and reel. Tweak the D-ring positions until everything can be performed smoothly underwater and you can easily clip to the D-rings with every attempt. Congratulations, your hogarthian harness is ready to dive! |
|